Saturday, March 24, 2012

Dilly Baby potatoes

I love baby red or white potatoes. Or the mini fingerling potatoes I get at Trader Joe's now and then. Like today. And it is so easy to turn them into a nice, easy little side dish. This recipe is for one net bag of potatoes. (Maybe 30 real small potatoes.)


Clean your potatoes but leave the skin on. Boil them in a pot of salted water until you can poke them easily with a fork, but don't let them get mushy.

Drain the water off, and return to the stove, on low heat. Then add the following ingredients:

4 Tbsp. butter
2 tsp. garlic salt
OR 1 tsp. garlic powder
2 tsp. dill weed
1 tsp. rosemary, optional

I don't always use the rosemary, but it adds a really nice flavor.

Stir until the butter is melted, and then serve. So simple, and so tasty.

Meatloaf with a Kick

My Aunt Pearl makes a great meatloaf and this is mostly her recipe. I added the horseradish and/or wasabi, and added a little more Worcestershire and more crackers than she calls for. Otherwise, this is her recipe and is found in our family cookbook.

Meatloaf is a great comfort food, and a great way to use some 'cheap' hamburger. OK, no hamburger is cheap, but I'm talking about the kind that has a higher fat content, therefore it is cheaper.

In order to keep the grease out of your meatloaf, put a couple slices of bread in the bottom of the loaf pan to soak it up. Just be sure not to plate any of the greasy bread when you serve up the meatloaf. Although, by the time it has finished baking, the bread takes on a bit of a crust, so it wouldn't be horrible if you accidentally dished it up too. I just don't recommend it.


Here is what you will need:

2 lbs of hamburger
1 sleeve saltine crackers, crushed
1/4 of an onion, chopped
1/4 tsp salt
1/4 tsp pepper
3/4 C milk
1 egg
About 6 shakes Worcestershire sauce
2 tsp horseradish or wasabi sauce

Place the slices of bread in the bottom of the loaf pan. Preheat the oven to 400.

Mix all other ingredients with your hands to get it all well mixed together. Pat down into loaf pan; it will completely fill the pan. If it overflows the pan a little, when you place it in the oven put a baking sheet under it to catch any possible dribbles. (You only need to crush the crackers, as if you're putting them into a bowl of soup. Coarse pieces, not tiny pieces.)


Ready to go into the oven. Bake at 400 for one hour.


Just out of the oven.

Wednesday, March 21, 2012

No Bake Cookies (aka Dog Dumps)


OK, I'm sorry. I don't know, for sure, where that name came from, but I do know when we were kids we would ask Mom to make Dog Dumps. This is what we ended up with.

This recipe is SO simple. Rick gets after me for saying that about many things that I make, saying, "It might be so simple for you, but not for everyone." I know, that's true, only because I have experience from so many years of cooking, which includes lots of trial and error. However, this truly is such a simple recipe that even your children will do a great job with it.

Here's what you will need:

2 cups granulated sugar
4 Tbsp cocoa
1 stick butter
1/2 cup milk
1 cup peanut butter
1 tablespoon vanilla
3 cups oatmeal

In a heavy saucepan, add your sugar, cocoa, butter and milk. Bring to a boil and remove from heat after just one minute.

Immediately add your peanut butter, vanilla and oatmeal and stir until mixed thoroughly. Drop by spoonfuls* onto waxed paper. (In the picture you will see that I dropped them onto aluminum foil. That's because I discovered too late that I was out of waxed paper.) Let them cool completely.


*I like to use an ice cream scoop because you get nice, uniform scoops and because the scoop mechanism removes all of the mixture in one scoop, instead of having to coax it out with a spoon or your fingers. I use an ice cream scoop for every kind of cookie I make.

This recipe makes 32 cookies. They are caramel colored even though there is cocoa in them.

Don't let the silly name fool you - these are yummy!


Here's a clean up tip: As soon as you have scooped out all of the cookies, place your pan in the sink and fill with water to soak. If you don't, it becomes much more challenging to get that glue-like mixture out of the pan after it hardens.


Uh-oh! Caught with my hand in the cookie jar!

Potato Patties


In a previous post I talked about making "extra" mashed potatoes so that I could make potato patties with the leftovers. It makes a great breakfast item, or a side dish with your supper.

Mashed potatoes
1 C (or so) Panko bread crumbs
2 Tbsp. butter
Salt & pepper to taste

Place the Panko on a plate. Take a hand full of your leftover mashed potatoes and flatten out, similar to the method you would use to make a hamburger pattie. Make it about the size of your palm or a little bigger. You want it to be manageable to handle, because it will be crumbly or a little hard to turn in your skillet if the pattie is too big.

Roll the pattie in the Panko, pressing down gently to push the crumbs into the potato. The Panko will help hold it together, but it will also give it a slight crunch, which I like.

Melt your butter in the skillet over medium or medium-low heat and place the patties in the skillet. Unless your patties are too thick, it should only take about 3 minutes per side to come to a nice golden brown. Sprinkle with salt & pepper as they are browning.


Pictured here with chicken and citrus cream sauce, and a green salad.

Pork Chops with sage


I feel kind of silly making this post because this isn't really a "recipe" but more a reason to show how truly easy it is to make great tasting pork chops. And, it's a very quick meal to fix.

This will work with any pork chops, but the ones I have here are boneless pork sirloin chops. I usually buy the bone-in, but these were on a BOGO sale.

Pork chops
1 tsp. sage
Butter or oil for pan
Salt & pepper to taste

Place a little butter and/or veg oil in your skillet and turn onto medium or medium-low. I cook on a gas range and medium can run a little too hot so I usually cook over medium-low.

Place your pork chops in the skillet and sprinkle a little sage and your salt & pepper over them. It will only take 4-5 minutes per side for the chops to be done. You want to make sure that when you poke them with a fork or knife that your juice doesn't have any pink in it. The juice must be clear in order for the chops to be considered done. When you turn them over the first time, be sure to sprinkle more sage, salt & pepper on them. If you don't like sage, leave it off. Salt & pepper by themselves are great too. (Although, this amount of sage is not overpowering at all.)

When your chops are done, if you are going to make gravy, remove the chops to a plate covered with foil and make your gravy in the same skillet. You'll get some good flavoring in your gravy from what is left in the pan.

Friday, March 16, 2012

Mashed Potatoes (in the mixer)

I got a new KitchenAid stand mixer a year ago and soon after, a friend of mine asked what I had made in it so far. I named a few things and she asked, "No mashed potatoes?" I said, "You make mashed potatoes in a mixer?" And for the last year, that's the only way I've made mashed potatoes. Thanks for the tip, Erin!

Even though I mostly cook for 2 people, when I make mashed potatoes I always make way more than a serving for 2. Because we love mashed potatoes and because I like to make potato patties with the leftovers.

I leave the skins on the potatoes and I'm not going to pretend it's because all the vitamins are in the skins. It's simply because I'm lazy. Peeling potatoes is my least favorite cooking chore to do. If you want to peel the potatoes, by all means, do. Knock yourself out.

When you leave the skins on, these will not be lump-free mashed potatoes, obviously. If you want them truly lump-free, peel the potatoes and let them mix longer.

6 potatoes, quartered
6 Tbsp. butter
1/2 a stick of cream cheese (about 4 oz.)
3/4 C milk or cream or half & half

Boil the potatoes in salted water just until the potatoes are tender enough to poke a fork into, but NOT mushy. Firm is best.


Place a wooden spoon over the pot when you first turn the burner on, and that prevents it from boiling over. Don't ask me why it works but it always does.

Drain the potatoes when they are done to your liking and then put them into the bowl of your stand mixer. Add butter, milk and cream cheese, then turn the mixer on low and let it mix for at least 5 minutes. Take a test, make any adjustments you want (add a little more butter or milk if needed) and then mix for at least another 5 minutes.


Easy.

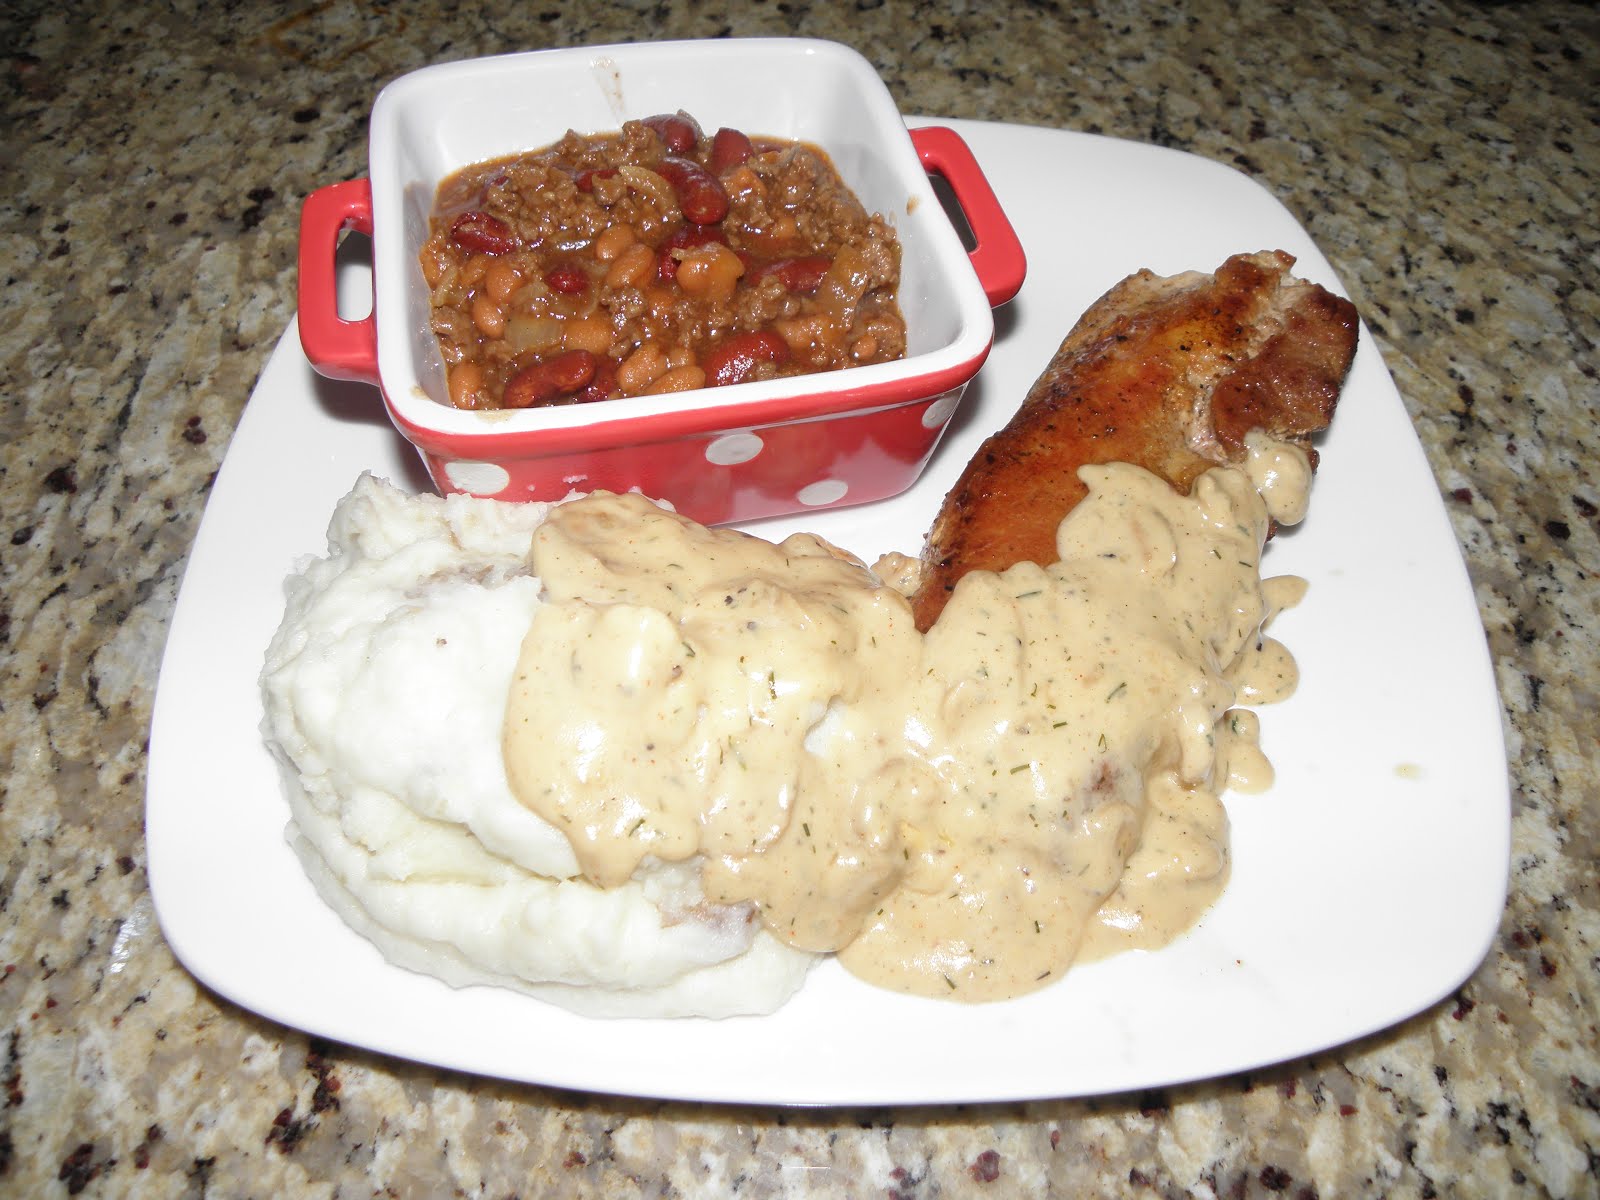
Pictured above with pork chops, gravy and baked beans.

4th of July Beans

For many years my family spent the week of the 4th of July over at my parents place in Eastern Washington. A lot of time was spent at the farm playing games, eating, playing the bean bag game out in the backyard, playing baseball in the front field, eating, laughing and more eating. Many hours were spent down at the Snake River too, complete with waterskiing, swimming, fishing, playing games, and of course, eating!

One of the dishes we had every year was the great side dish of baked beans that my Aunt Janice always made. They were SO good, but boy were they powerful in another way. So I named them 4th of July Beans for 2 reasons. One, because we had them every year we got together for the 4th of July, but also for the "fireworks" that happened awhile after eating these beans. Oh, those were fun times at the river. What a gas!


This picture doesn't show the hamburger or the onion, but these are the other ingredients.

Listed here are all of the ingredients:***

1.5 to 2 pounds ground beef
1/2 C chopped onion
1 large can pork-n-beans
1 15 oz. can kidney beans
1/2 C brown sugar
3/4 C ketchup
1/2 C BBQ sauce
1 pkg. dry onion soup mix
1 Tbsp. prepared mustard
1 tsp. chili powder

I love to use a Dutch oven because you can brown your hamburger and then make the rest of the dish in the same pot.

Brown your hamburger. While it is browning add your chopped onions. When the hamburger is browned throughout, drain it, if needed.

To the browned hamburger add all of the other ingredients and stir frequently over medium-low heat. Reduce heat to low after about 20 minutes and let it simmer, stirring frequently. It will be ready to eat in less than an hour, but if you want you can put it into a 300 degree oven and let it further bake for another hour or so.


Once in awhile I add some bacon to this, and of course that's great.

This is ALWAYS a big hit.


***For those of you that have this recipe from our family cookbook, this is a slight variation from that, but generally the same. Both are great.

My dear Aunt Janice passed away 5 years ago and I miss her a ton. She left me with lots of great memories and some great recipes too!